If you check the HaxeFlixel’s particle demo page, you can see some basic examples of particle usage. In this tutorial, we’ll cover the following sections:
- Create default particle emitter
- Adding custom image
- Animating custom image
- Adjusting particle properties
Setup
Let’s create a new HaxeFlixel template project as usual:
|
1 |
flixel tpl -n "MyParticleTest" |
For assets, we can use any image for testing custom particle images, so let’s go for Julien’s Sparkles spritesheet. Download the zip and extract the sparkle.png into your /assets/images folder.
Introduction
Particles are generated from emitters. As such, you only need to check the API pages for FlxParticle and FlxEmitter for more info on how to implement particle effects. In a nutshell, you need an emitter (FlxEmitter) to “emit” particles (FlxParticle).
Default Particle Emitters
Following the code from FlashGameDojo (it’s in ActionScript 3, but it’s very similar to Haxe anyway) — here’s the most basic code to write an emitter:
|
1 2 3 4 5 6 7 8 9 10 11 12 13 14 15 16 17 18 19 20 21 22 23 24 25 26 27 28 29 30 31 32 33 34 35 36 37 38 39 40 41 42 43 44 45 46 |
package; import flixel.FlxState; import flixel.FlxG; import flixel.effects.particles.FlxEmitter; import flixel.effects.particles.FlxParticle; class MenuState extends FlxState { override public function create():Void { super.create(); // Create an emitter at [200,100] position var emitter = new FlxEmitter(200, 100); // Remember that emitters are just FlxGroups // that help you recycle particles for repeated // usage. As such, we need to add the particles // into the emitters before we can use them. for (i in 0 ... 5) { var p = new FlxParticle(); p.makeGraphic(2, 2, 0xFFFFFFFF); p.exists = false; emitter.add(p); } // Add emitter to stage add(emitter); // Start emitter as non-explosion, at a rate // of 1 particle every 0.1 seconds. emitter.start(false, 1, 0.1); } override public function update():Void { super.update(); } override public function destroy():Void { super.destroy(); } } |
And when you build with lime test neko , you see the result:
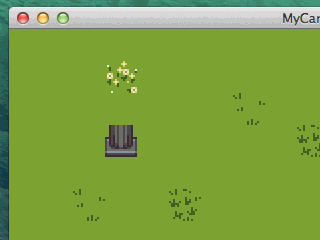
You may notice the default white particles emitting correctly, but there seems to be a problem — the default HaxeFlixel logo gets emitted too. What went wrong?
Note that the white particles are the 2×2 pixel white squares we wrote in the p.makeGraphic(...) line above. We only created 5 particles for the emitter in the loop. Since the emitter needs to emit 1 particle per 0.1 second, it will run out of particles in its pool after 0.5 seconds. As a result, it generates its own FlxParticle objects that do not have a default image — resulting in the logo.
So the easiest fix is to adjust the loop to add more particles, from 5 to say, 15 or 20, so we’ll never run out of particles:
|
1 2 3 4 5 6 7 8 9 10 11 |
// Remember that emitters are just FlxGroups // that help you recycle particles for repeated // usage. As such, we need to add the particles // into the emitters before we can use them. for (i in 0 ... 20) { var p = new FlxParticle(); p.makeGraphic(2, 2, 0xFFFFFFFF); p.exists = false; emitter.add(p); } |
And now it looks fixed:

Custom Particle Images
To add custom images to particles, you just need to load a graphic during particle creation:
|
1 2 3 4 5 6 7 8 9 10 11 |
// Remember that emitters are just FlxGroups // that help you recycle particles for repeated // usage. As such, we need to add the particles // into the emitters before we can use them. for (i in 0 ... 20) { var p = new FlxParticle(); p.loadGraphic("assets/images/sparkle.png", false, 32, 32); p.exists = false; emitter.add(p); } |
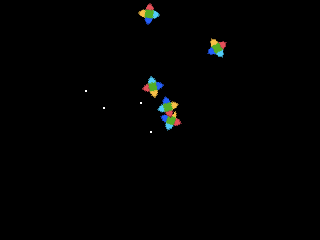
Just note the size of each sprite in the spritesheet. In the case of sparkle.png, each frame is 32×32. Now when you test, the sparkle image is used:
It’s a little too small to see, but that’s the default size of the first sparkle frame’s image anyway.
Animating Particles
To animate the particles, you just need to add animation during creation, exactly like how you would for FlxSprites:
|
1 2 3 4 5 6 7 8 9 10 11 12 13 |
// Remember that emitters are just FlxGroups // that help you recycle particles for repeated // usage. As such, we need to add the particles // into the emitters before we can use them. for (i in 0 ... 20) { var p = new FlxParticle(); p.loadGraphic("assets/images/sparkle.png", false, 32, 32); p.animation.add("my-sparkle", [0,1,2,3], 10, true); p.animation.play("my-sparkle"); p.exists = false; emitter.add(p); } |
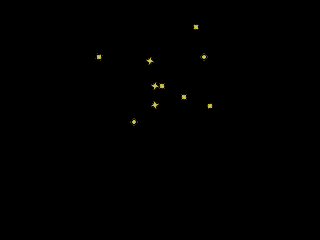
And the output:

Okay, using what we’ve learned so far, let’s try different examples on how to use the emitter:
- Fire smoke trail
- Explosion
- Explosion with particle gravity
Fire Smoke Trail
We’re going to create smoke puffs that goes upwards, slowly fading away. Among the attributes we set include alpha fading, color fading, and size changing, and particle origin jitter:
|
1 2 3 4 5 6 7 8 9 10 11 12 13 14 15 16 17 18 19 20 21 22 23 24 25 26 27 28 29 30 31 32 33 34 35 36 37 38 39 40 41 42 43 44 45 46 47 |
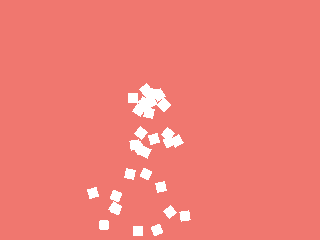
override public function create():Void { super.create(); // Set the background color for visibility sake FlxG.camera.bgColor = 0xFFFF6666; // Create an emitter at [200,100] position var emitter = new FlxEmitter(200, 200); // Remember that emitters are just FlxGroups // that help you recycle particles for repeated // usage. As such, we need to add the particles // into the emitters before we can use them. for (i in 0 ... 100) { var p = new FlxParticle(); p.makeGraphic(10, 10, 0xFFFFFFFF); // p.loadGraphic("assets/images/sparkle.png", false, 32, 32); // p.animation.add("my-sparkle", [0,1,2,3], 10, true); // p.animation.play("my-sparkle"); p.exists = false; emitter.add(p); } // Add emitter to stage add(emitter); // Set radius around origin where particles will appear emitter.setSize(25, 25); // Set particle's range of x/y directional speed emitter.setXSpeed(-20, 20); emitter.setYSpeed(-100, -200); // goes upwards // Set particle to fade opacity as it goes upwards emitter.setAlpha(1,1,0,0); // Set particle to fade color as it goes upwards emitter.setColor(0xFFFFFFFF, 0xFF000000); // Set particle size (scale) range, and grow larger as it fades emitter.setScale(0.5, 1, 2, 2.5); // Start emitting at 1 particle per 0.02 seconds emitter.start(false, 1, 0.02); } |
And here is the result:

One thing I excluded was setting the rotation — by default, particles will rotate randomly. But if you don’t want particles to rotate, just set it like this:
|
1 |
emitter.setRotation(0,0); |
Explosions
Explosions are the default behaviour of FlxEmitter — as demonstrated at the beginning of this tutorial. Referring to the API, the emitter’s default start function only “emits” the explosion once, like this:
|
1 |
emitter.start(); |
Explosions With Particle Gravity
This is demonstrated in the Particle demo page — it’s as easy as adding gravity to the emitter:
|
1 2 3 4 5 6 7 8 9 10 11 12 13 14 15 16 17 18 19 20 21 22 23 24 25 26 27 28 29 30 31 32 33 34 |
override public function create():Void { super.create(); // Set the background color for visibility sake FlxG.camera.bgColor = 0xFFFF6666; // Create an emitter at [200,100] position var emitter = new FlxEmitter(200, 200); // Remember that emitters are just FlxGroups // that help you recycle particles for repeated // usage. As such, we need to add the particles // into the emitters before we can use them. for (i in 0 ... 100) { var p = new FlxParticle(); p.makeGraphic(10, 10, 0xFFFFFFFF); // p.loadGraphic("assets/images/sparkle.png", false, 32, 32); // p.animation.add("my-sparkle", [0,1,2,3], 10, true); // p.animation.play("my-sparkle"); p.exists = false; emitter.add(p); } // Add emitter to stage add(emitter); // Add gravity to each particle emitter.gravity = 800; // Start emitting at 1 particle per 0.02 seconds emitter.start(false, 1, 0.02); } |
And the result:
Note the code above assumes we’re emitting the explosion in 0.02 second intervals. If you only want to do it once, set the interval to 0 instead of 0.02
One last thing — to stop the emitter, just do this:
|
1 |
emitter.kill(); |
Closure
Particle effects can be easily added to the game using FlxEmitter. The most common usage is explosion and smoke.
One example is “bursting coins out of a treasure chest”, where the emitter “emits” a single burst of coins. If you want an example of how to do this, check out PhotonStorm’s excellent Collectible Particles tutorial.
Check out his other Flixel tutorial series, they’re very helpful! They’re in ActionScript 3, but still relevant.
This concludes the tutorial on HaxeFlixel particles and emitters.