
If you check the flixel-demos Github page, you can find sample code on how to implement split screen camera, as shown on the demo page.
In this tutorial, we will create a simple platformer which implements 4 cameras. The purpose is to demonstrate that it is possible to have multiple cameras with different properties.
Setup
As usual, let’s create a new template HaxeFlixel project from the terminal:
|
1 |
flixel tpl -n "MyCameraTest2" |
We won’t be needing any assets, because we’ll use the default HaxeFlixel graphics.
Code
First, let’s create a map:
|
1 2 3 4 5 6 7 8 9 10 11 12 13 14 15 16 17 18 19 20 21 22 23 24 25 26 27 28 29 30 31 32 33 34 35 36 37 38 39 40 41 42 43 44 45 46 47 48 49 50 |
package; import flixel.FlxState; import flixel.FlxG; import flixel.tile.FlxTilemap; class MenuState extends FlxState { var level:FlxTilemap; override public function create():Void { super.create(); // Set the camera background as white for visibility sake FlxG.camera.bgColor = 0xFFFFFFFF; // Create level var levelData:Array<Int> = [ 1,1,1,1,1,1,1,1,1,1,1,1,1,1,1,1,1,1,1,1, 1,0,0,0,0,0,0,0,0,0,0,0,0,0,0,0,0,0,0,1, 1,0,0,0,0,0,0,0,0,0,0,0,0,0,0,0,0,0,0,1, 1,0,0,0,0,0,0,0,0,0,0,0,0,0,0,1,1,1,1,1, 1,1,1,0,0,0,0,0,0,0,0,0,0,0,0,1,1,1,1,1, 1,1,1,0,0,0,0,0,0,1,1,0,0,0,0,0,0,0,0,1, 1,1,1,1,1,1,0,0,0,1,1,0,0,0,0,0,0,0,0,1, 1,1,1,1,1,1,0,0,0,0,0,0,0,0,0,0,0,0,0,1, 1,0,0,0,0,0,0,0,0,0,0,0,0,1,1,1,1,1,1,1, 1,0,0,0,0,0,0,0,0,0,0,0,0,1,1,1,1,1,1,1, 1,0,0,0,0,0,0,0,0,0,0,1,1,1,1,1,1,1,1,1, 1,0,0,0,0,0,0,0,0,0,0,1,1,1,1,1,1,1,1,1, 1,1,1,0,0,0,0,0,0,1,1,1,1,1,1,1,1,1,1,1, 1,1,1,0,0,0,0,0,0,1,1,1,1,1,1,1,1,1,1,1, 1,1,1,1,1,1,1,1,1,1,1,1,1,1,1,1,1,1,1,1 ]; level = new FlxTilemap(); level.loadMap(flixel.util.FlxStringUtil.arrayToCSV(levelData, 20), GraphicAuto, 8, 8, FlxTilemap.AUTO); add(level); } override public function update():Void { super.update(); } override public function destroy():Void { super.destroy(); } } |
And here’s the result when you build it with lime test neko :
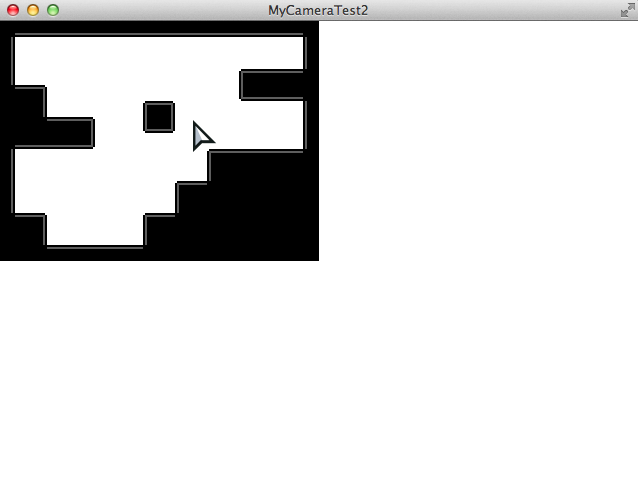
And now let’s add a playable character, complete with collision and movement logic:
|
1 2 3 4 5 6 7 8 9 10 11 12 13 14 15 16 17 18 19 20 21 22 23 24 25 26 27 28 29 30 31 32 33 34 35 36 37 38 39 40 41 42 43 44 45 46 47 48 49 50 51 52 |
package; import flixel.FlxState; import flixel.FlxG; import flixel.tile.FlxTilemap; import flixel.FlxSprite; class MenuState extends FlxState { var level:FlxTilemap; var player:FlxSprite; override public function create():Void { super.create(); // Set the camera background as white for visibility sake ... // Create level ... // Create player player = new FlxSprite(50, 20); player.makeGraphic(5, 10, 0xFFFF0000); // create red square as player player.acceleration.y = 800; // add gravity add(player); } override public function update():Void { super.update(); // Collide player with level. FlxG.collide(level, player); // Reset velocity by default, if not moving player.velocity.x = 0; // Move player if (FlxG.keys.pressed.LEFT) player.velocity.x = -100; if (FlxG.keys.pressed.RIGHT) player.velocity.x = 100; // Jump player only if touching ground if (FlxG.keys.pressed.UP && player.isTouching(flixel.FlxObject.FLOOR)) player.velocity.y = -200; } override public function destroy():Void { super.destroy(); } } |
And here’s how it’ll look:

Although it isn’t shown, the camera takes up the full area of the screen (in the case above, it’s 640 x 480). We can resize the cameras to only fit a portion of the screen — and along with this, we can create multiple cameras, to achieve split-screen multiplayer effects. Let’s add some code to make this happen:
|
1 2 3 4 5 6 7 8 9 10 11 12 13 14 15 16 17 18 19 20 21 22 23 24 25 26 27 28 29 30 31 32 33 34 35 36 37 38 39 40 41 42 43 44 45 46 47 48 49 50 51 52 53 54 55 56 57 58 59 60 61 62 63 64 65 66 67 68 69 70 71 72 73 74 75 76 77 |
package; import flixel.FlxState; import flixel.FlxG; import flixel.tile.FlxTilemap; import flixel.FlxSprite; import flixel.FlxCamera; class MenuState extends FlxState { var level:FlxTilemap; var player:FlxSprite; override public function create():Void { super.create(); // Set the camera background as white for visibility sake ... // Create level ... // Create player ... // Create cameras // We want 4 cameras on screen, so each camera should be // half in width and height. var halfW:Int = Std.int(FlxG.width/2); var halfH:Int = Std.int(FlxG.height/2); // Create new cameras var cam1 = createCamera(0, 0, halfW, halfH, 0xFF00FF00); var cam2 = createCamera(halfW*2, 0, halfW, halfH, 0xFFFFFF00); var cam3 = createCamera(0, halfH*2, halfW, halfH, 0xFF00FFFF); var cam4 = createCamera(halfW*2, halfH*2, halfW, halfH, 0xFFFF00FF); // Use reset() to delete the current existing camera and replace // it with a new one. To add more cameras, use add(). FlxG.cameras.reset(cam1); FlxG.cameras.add(cam2); FlxG.cameras.add(cam3); FlxG.cameras.add(cam4); } function createCamera (X:Int, Y:Int, W:Int, H:Int, C:Int):FlxCamera { // Create a new camera with new x/y position, and at w/h sizes var camera:FlxCamera = new FlxCamera(X, Y, W, H); camera.bgColor = C; return camera; } override public function update():Void { super.update(); // Collide player with level. ... // Reset velocity by default, if not moving ... // Move player ... // Jump player only if touching ground ... } override public function destroy():Void { super.destroy(); } } |
Note: The FlxG has a variable camera that controls the first main camera, whereas the cameras variable holds an list of all the cameras. Be careful not to make typos here.
Now when you test, you’ll get this:

Notice that the background of each camera is of a different colour, but the screen is still showing the same content (one red player moving around). What this means to us, is that we know each camera has properties that can be customised individually.
Now, by knowing this, we can expand on the code to do the following:
|
1 2 3 4 5 6 7 8 9 10 11 12 13 14 15 16 17 18 19 20 21 22 23 24 25 26 27 28 29 30 31 32 33 34 35 36 37 38 39 40 41 42 43 44 45 46 47 48 49 50 51 52 53 54 55 56 57 58 59 60 61 62 63 64 65 66 67 68 69 70 71 72 73 74 75 76 77 78 79 80 81 82 83 84 85 86 87 88 89 90 91 92 93 94 95 96 97 98 99 100 101 102 103 104 105 106 107 108 109 110 111 112 113 114 115 |
package; import flixel.FlxState; import flixel.FlxG; import flixel.tile.FlxTilemap; import flixel.FlxSprite; import flixel.FlxCamera; class MenuState extends FlxState { var level:FlxTilemap; var player1:FlxSprite; var player2:FlxSprite; var player3:FlxSprite; var player4:FlxSprite; override public function create():Void { super.create(); // Set the camera background as white for visibility sake ... // Create level ... // Create player player1 = createPlayer(20, 20, 0xFFFF0000); player2 = createPlayer(140, 10, 0xFF00FF00); player3 = createPlayer(20, 70, 0xFF0000FF); player4 = createPlayer(140, 50, 0xFFFF00FF); add(player1); add(player2); add(player3); add(player4); // Create cameras // We want 4 cameras on screen, so each camera should be // half in width and height. var halfW:Int = Std.int(FlxG.width/2); var halfH:Int = Std.int(FlxG.height/2); // Create new cameras var cam1 = createCamera(0, 0, halfW, halfH, 0xFFFFFFFF, player1); var cam2 = createCamera(halfW*2, 0, halfW, halfH, 0xCCFFFFFF, player2); var cam3 = createCamera(0, halfH*2, halfW, halfH, 0x99FFFFFF, player3); var cam4 = createCamera(halfW*2, halfH*2, halfW, halfH, 0x66FFFFFF, player4); // Use reset() to delete the current existing camera and replace // it with a new one. To add more cameras, use add(). FlxG.cameras.reset(cam1); FlxG.cameras.add(cam2); FlxG.cameras.add(cam3); FlxG.cameras.add(cam4); } function createPlayer (X:Int, Y:Int, C:Int):FlxSprite { var player = new FlxSprite(X, Y); player.makeGraphic(5, 10, C); // create red square as player player.acceleration.y = 800; // add gravity return player; } function createCamera (X:Int, Y:Int, W:Int, H:Int, C:Int, P:FlxSprite):FlxCamera { // Create a new camera with new x/y position, and at w/h sizes var camera:FlxCamera = new FlxCamera(X, Y, W, H); camera.bgColor = C; camera.follow(P); return camera; } override public function update():Void { super.update(); // Collide player with level. // NOTE: there is a better way to write collisions between // the level and players, but let's ignore that for now. FlxG.collide(level, player1); FlxG.collide(level, player2); FlxG.collide(level, player3); FlxG.collide(level, player4); // Reset velocity by default, if not moving player1.velocity.x = 0; player2.velocity.x = 0; player3.velocity.x = 0; player4.velocity.x = 0; // Move player if (FlxG.keys.pressed.A) player1.velocity.x = -100; if (FlxG.keys.pressed.S) player1.velocity.x = 100; if (FlxG.keys.pressed.W && player1.isTouching(flixel.FlxObject.FLOOR)) player1.velocity.y = -200; if (FlxG.keys.pressed.F) player2.velocity.x = -100; if (FlxG.keys.pressed.G) player2.velocity.x = 100; if (FlxG.keys.pressed.T && player2.isTouching(flixel.FlxObject.FLOOR)) player2.velocity.y = -200; if (FlxG.keys.pressed.J) player3.velocity.x = -100; if (FlxG.keys.pressed.K) player3.velocity.x = 100; if (FlxG.keys.pressed.I && player3.isTouching(flixel.FlxObject.FLOOR)) player3.velocity.y = -200; if (FlxG.keys.pressed.LEFT) player4.velocity.x = -100; if (FlxG.keys.pressed.RIGHT) player4.velocity.x = 100; if (FlxG.keys.pressed.UP && player4.isTouching(flixel.FlxObject.FLOOR)) player4.velocity.y = -200; } override public function destroy():Void { super.destroy(); } } |
When you test, you will see that this is starting to look like a 4-player split-screen game:
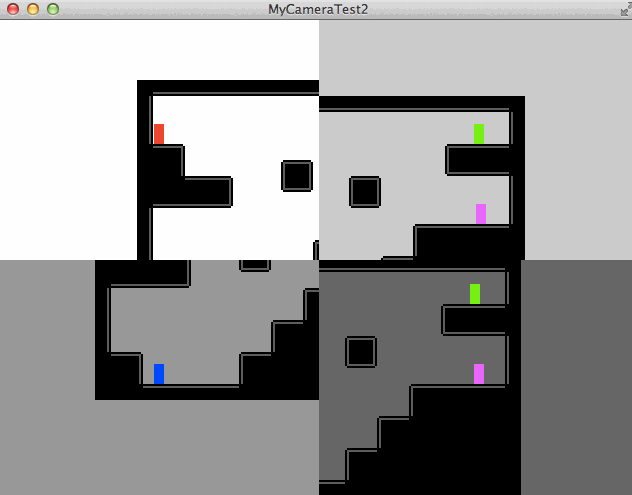
Please excuse the erratic movements — I was mashing my keyboard to simulate 4 players moving around in their individual screens.
Anyway, I hope this tutorial gives you an idea of how multiple cameras can be used (e.g. for mini-maps or split-screen multiplayers). You can refer to the FlxCamera API for more info. This concludes the tutorial on creating multiple cameras in HaxeFlixel.