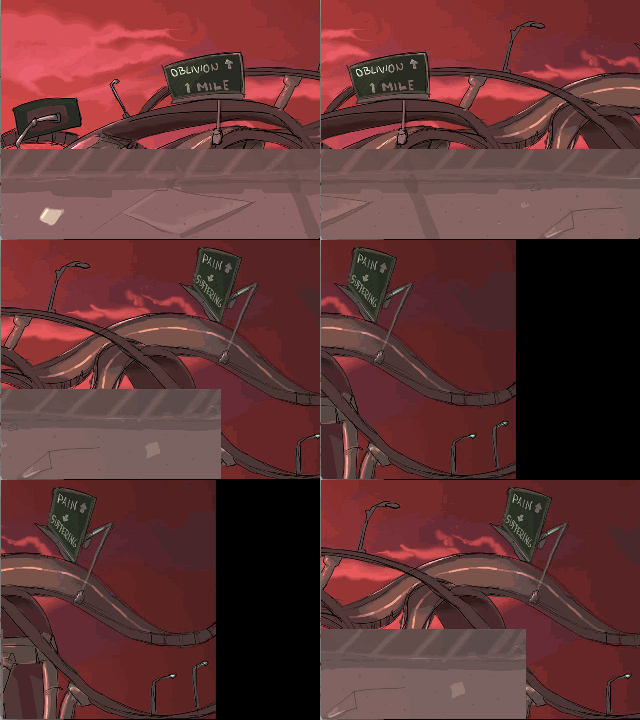
One great way to enhance the feel of your game is parallax scrolling. I could only find tutorials that briefly mention it, so here’s one dedicated to parallax scrolling. In most cases, parallax is used on horizontal plane, so we’ll proceed with that in mind.
Setup
For placeholder images, let’s use some background images from OpenGameArt, Red Baron Backgrounds by MindChamber. Download the zip, and extract it somewhere.
We’ll be using the following files for this tutorial: highwayz – Copy.jpg and highwayz_floor.jpg. I didn’t include the images here in this tutorial so you would go and download the original files from the link above — to support the author 🙂 Anyway, put those two images into your /assets/images folder and move on.
Now let’s create a HaxeFlixel template project, as usual:
|
1 |
flixel tpl -n "MyParallaxTest" |
Now we can proceed with the code-related stuff.
Code Setup
Parallax effect can be easily achieved by setting the scrollFactor value.
If you want to have parallax backgrounds which are repeated, you will need FlxBackdrop , which is part of the flixel-addons haxelib. To enable the flixel-addons haxelib, go to your Project.xml file and enable the following code:
|
1 2 |
<!--In case you want to use the addons package--> <haxelib name="flixel-addons" /> |
To use parallax effect, you only need to do two things:
- Create an FlxSprite (or anything derived from FlxObject) and set its scrollFactor value
- OR create a FlxBackdrop and specify the X/Y scroll rate, and whether it repeats on the X-plane and/or Y-plane.
- Scroll the camera!
Parallax with [scrollFactor]
The code below demonstrates the above parallax with only scrollFactor :
|
1 2 3 4 5 6 7 8 9 10 11 12 13 14 15 16 17 18 19 20 21 22 23 24 25 26 27 28 29 30 31 32 33 34 35 36 37 38 39 40 41 42 43 44 45 |
package; import flixel.FlxState; import flixel.FlxG; import flixel.FlxSprite; class MenuState extends FlxState { override public function create():Void { super.create(); // Create image that scrolls at x2 speed based on the camera's scroll var bg:FlxSprite = new FlxSprite(0,0); bg.loadGraphic("assets/images/highwayz - Copy.jpg"); bg.scrollFactor.x = 2; // Create image that scrolls at x3 speed based on the camera's scroll var fg:FlxSprite = new FlxSprite(0,0); fg.loadGraphic("assets/images/highwayz_floor.jpg"); fg.scrollFactor.x = 3; // move the floor lower so we can see the background. fg.y = 300; // Add the backdrops in order. add(bg); add(fg); } override public function update():Void { super.update(); // Test input to scroll the camera. FlxBackdrop will // handle the parallax scrolling automatically. if (FlxG.keys.pressed.LEFT) FlxG.camera.scroll.add(-5, 0); if (FlxG.keys.pressed.RIGHT) FlxG.camera.scroll.add(5, 0); } override public function destroy():Void { super.destroy(); } } |
And that’s it! Build with lime test neko and you can test the parallax with the LEFT/RIGHT arrow keys.
From other tutorials, like this (Dustytome) and this (Haxecoder), we can observe that scrollFactor/parallax technique can be applied to groups of objects or even UI elements, depending on your creativity. 🙂
Parallax with [FlxBackdrop]
If you want repeated backgrounds in your parallax scrolling, just modify the following lines from the above code:
|
1 2 3 4 5 6 7 8 9 10 11 12 13 14 15 16 17 18 19 20 21 22 23 24 25 26 27 28 29 30 31 32 33 34 |
package; import flixel.FlxState; import flixel.FlxG; // import flixel.FlxSprite; import flixel.addons.display.FlxBackdrop; class MenuState extends FlxState { override public function create():Void { super.create(); // Create image that scrolls at x2 speed based on the camera's scroll // var bg:FlxSprite = new FlxSprite(0,0); // bg.loadGraphic("assets/images/highwayz - Copy.jpg"); // bg.scrollFactor.x = 2; var bg:FlxBackdrop = new FlxBackdrop("assets/images/highwayz - Copy.jpg", 2, 0, true, false); // Create image that scrolls at x3 speed based on the camera's scroll // var fg:FlxSprite = new FlxSprite(0,0); // fg.loadGraphic("assets/images/highwayz_floor.jpg"); // fg.scrollFactor.x = 3; var fg:FlxBackdrop = new FlxBackdrop("assets/images/highwayz_floor.jpg", 3, 0, true, false); // move the floor lower so we can see the background. ... // Add the backdrops in order. ... } ... } |
And here’s the result:
There’s nothing much on the API page for FlxBackdrop, so I guess the usage is straight-forward.

