
In the previous post we loaded CSV data to display a tiled map in HaxeFlixel. But I forgot to talk about what to do after loading the data, so let’s run through a quick tutorial on how to parse the loaded map data.
Let’s assume you’ve created a template HaxeFlixel project, and this is how your MenuState.hx looks like:
|
1 2 3 4 5 6 7 8 9 10 11 12 13 14 15 16 17 18 19 20 21 22 23 24 25 26 27 28 29 30 31 32 |
package; import flixel.FlxState; import flixel.FlxG; import flixel.tile.FlxTilemap; import openfl.Assets; class MenuState extends FlxState { var level:FlxTilemap; override public function create():Void { super.create(); level = new FlxTilemap(); var mapData:String = Assets.getText("assets/data/tutorial-map.csv"); var mapTilePath:String = "assets/images/tumblr_mh2mhude3E1qcptgwo1_250.png"; level.loadMap(mapData, mapTilePath, 16, 16); add(level); } override public function update():Void { super.update(); } override public function destroy():Void { super.destroy(); } } |
If you test the game with lime test neko now, you should get this:

A lot of other tutorials would have mentioned this, but in case you didn’t know yet — To change the resolution of the screen, you just need to modify these variables in Main.hx:
|
1 2 |
var gameWidth:Int = 320; // Width of the game in pixels (might be less / more in actual pixels depending on your zoom). var gameHeight:Int = 240; // Height of the game in pixels (might be less / more in actual pixels depending on your zoom). |
… and now it should look like this:

Even though the map is loaded, it’s just a static image. There’s no player code, or wall data, or anything else. So how do we code from here? Assuming that we’re using the layout above, here’s the CSV data (generated from Tiled, and using Derek Yu’s tilesheet):
|
1 2 3 4 5 6 7 8 9 10 11 12 13 14 15 |
21,21,21,21,21,21,21,21,21,21,21,21,21,21,21,21,21,21,21,21 21,-1,-1,-1,-1,-1,21,-1,-1,-1,-1,-1,-1,-1,-1,-1,-1,-1,-1,21 21,-1,2,-1,-1,-1,21,-1,-1,-1,-1,-1,-1,-1,-1,-1,-1,-1,-1,21 21,-1,-1,-1,-1,-1,21,-1,-1,-1,-1,-1,-1,-1,-1,20,-1,-1,-1,21 21,-1,-1,-1,-1,-1,21,-1,-1,-1,-1,-1,-1,-1,-1,-1,-1,-1,-1,21 21,21,21,65,21,21,21,-1,-1,-1,-1,-1,-1,-1,-1,-1,-1,-1,-1,21 21,-1,-1,-1,-1,-1,-1,-1,-1,-1,-1,-1,-1,-1,-1,-1,-1,-1,-1,21 21,-1,-1,-1,-1,-1,-1,-1,-1,-1,-1,-1,-1,-1,37,37,37,37,37,21 21,-1,-1,-1,-1,-1,-1,-1,-1,-1,-1,-1,-1,-1,37,37,37,37,37,21 21,-1,-1,-1,-1,-1,-1,-1,-1,-1,-1,-1,-1,-1,37,37,-1,-1,-1,21 21,-1,-1,-1,-1,10,-1,-1,-1,-1,-1,-1,-1,-1,37,37,-1,-1,-1,21 21,-1,-1,-1,-1,-1,-1,-1,-1,-1,-1,-1,-1,-1,-1,-1,-1,-1,-1,21 21,-1,-1,-1,-1,-1,-1,-1,-1,-1,-1,-1,-1,-1,37,37,-1,32,-1,21 21,-1,-1,-1,-1,-1,-1,-1,-1,-1,-1,-1,-1,-1,37,37,-1,-1,-1,21 21,21,21,21,21,21,21,21,21,21,21,21,21,21,21,21,21,21,21,21 |
If you examine the tilesheet image, the numbers above correspond with the tile index, as noted below:
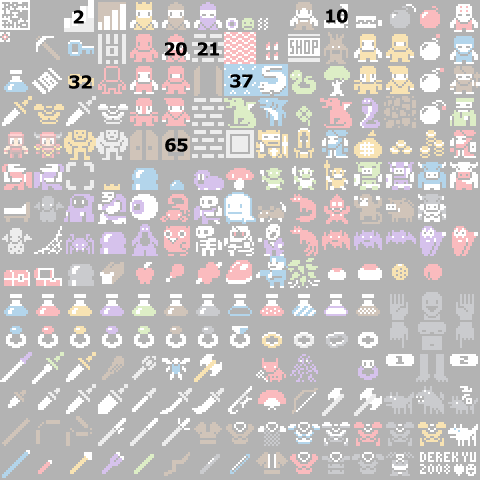
Let’s start with the player object first. We know that tile 20 is the red player tile, so how do we convert it into a game object?
|
1 2 3 4 5 6 7 8 9 10 11 12 13 14 15 16 17 18 19 20 21 22 23 24 25 26 27 28 29 30 31 32 33 34 35 36 37 38 39 40 41 42 43 44 45 46 47 48 49 50 51 52 53 54 55 56 57 58 59 60 61 62 63 64 65 66 67 68 69 70 71 |
package; import flixel.FlxState; import flixel.FlxG; import flixel.tile.FlxTilemap; import openfl.Assets; import flixel.FlxSprite; import flixel.util.FlxPoint; class MenuState extends FlxState { var level:FlxTilemap; var player:FlxSprite; override public function create():Void { super.create(); level = new FlxTilemap(); var mapData:String = Assets.getText("assets/data/tutorial-map.csv"); var mapTilePath:String = "assets/images/tumblr_mh2mhude3E1qcptgwo1_250.png"; level.loadMap(mapData, mapTilePath, 16, 16); add(level); /* For our player spawn code, we do the following: 1) get FlxPoint array of all tiles that are index "20" (the player tile image) 2) assuming there's only ever one player in the game at one time, get the first FlxPoint 3) use the FlxPoint to create a new FlxSprite at the target point */ var playerCoords:Array<FlxPoint> = level.getTileCoords(20, false); var playerPosition:FlxPoint = playerCoords[0]; addPlayer(playerPosition.x, playerPosition.y); /* Once we spawn the player, we need to remove the map tile with the value "20" (the player tile image). Otherwise, you'll see a tile image of the player under the actual player object as well. You can try commenting the 3 lines of code below to see what I mean. */ var playerTiles:Array<Int> = level.getTileInstances(20); var playerTile:Int = playerTiles[0]; level.setTileByIndex(playerTile, -1, true); // remove player map tile } function addPlayer(X:Float, Y:Float):Void { player = new FlxSprite(X, Y); player.loadGraphic("assets/images/tumblr_mh2mhude3E1qcptgwo1_250.png", false, 16, 16); player.animation.add("idle", [20]); player.animation.play("idle"); add(player); } override public function update():Void { super.update(); } override public function destroy():Void { super.destroy(); } } |
You can check the FlxTilemap API for more information on the functions used above. If you test the game, it should still look the same. We replaced the player tile with an actual player object, but we can’t control the player yet. So let’s add the code into the update() function, like this:
|
1 2 3 4 5 6 7 8 9 10 11 12 13 14 15 16 17 18 19 20 21 22 23 24 25 26 27 28 29 30 31 32 33 34 35 36 37 38 39 40 41 42 |
override public function update():Void { // Automatically handle collision on each update FlxG.collide(player, level); // NOTE: For collisions to work, objects need to be moved // using physics, i.e. setting its velocity. // Assuming that no key was pressed, the default velocity // of the player will be zero on X and Y axis (no movement). player.velocity.x = 0; player.velocity.y = 0; // save key press booleans into variables for easy readability var pressLeft = FlxG.keys.anyPressed(["LEFT"]); var pressRight = FlxG.keys.anyPressed(["RIGHT"]); var pressUp = FlxG.keys.anyPressed(["UP"]); var pressDown = FlxG.keys.anyPressed(["DOWN"]); // If any of the buttons were pressed, set the velocity // accordingly. if (pressLeft) { player.velocity.x = -100; } if (pressRight) { player.velocity.x = 100; } if (pressUp) { // NOTE: negative velocity is upwards player.velocity.y = -100; } if (pressDown) { // NOTE: positive velocity is downwards player.velocity.y = 100; } // NOTE: the collision will NOT work if you update its position // directly rather than setting its velocity, such as the code below: // player.x += 5; super.update(); } |
Great! Now if you test the game, you’ll be able to move the player and collide with the walls… but wait, you’re also colliding with the key, trap, and door. Why? Because all non-empty tiles (values other than -1) are automatically considered solid walls.
Since we already know how to replace the player tile with the player object, you can repeat the code for other objects. Let’s try to apply DRY (don’t repeat yourself) principle and modify our existing code, resulting in below:
|
1 2 3 4 5 6 7 8 9 10 11 12 13 14 15 16 17 18 19 20 21 22 23 24 25 26 27 28 29 30 31 32 33 34 35 36 37 38 39 40 41 42 43 44 45 46 47 48 49 50 51 52 53 54 55 56 57 58 59 60 61 62 63 64 65 66 67 68 69 70 71 72 73 74 75 76 77 78 79 80 81 82 83 84 85 86 87 88 89 90 91 92 93 94 95 96 97 98 99 100 101 102 103 104 105 106 107 108 109 110 111 112 113 114 115 116 117 118 119 120 121 122 123 124 125 126 127 128 |
package; import flixel.FlxState; import flixel.FlxG; import flixel.tile.FlxTilemap; import openfl.Assets; import flixel.FlxSprite; import flixel.util.FlxPoint; import flixel.group.FlxGroup; class MenuState extends FlxState { var level:FlxTilemap; var player:FlxSprite; var interactables:FlxGroup; override public function create():Void { super.create(); level = new FlxTilemap(); var mapData:String = Assets.getText("assets/data/tutorial-map.csv"); var mapTilePath:String = "assets/images/tumblr_mh2mhude3E1qcptgwo1_250.png"; level.loadMap(mapData, mapTilePath, 16, 16); add(level); // Initialise the objects first player = new FlxSprite(); interactables = new FlxGroup(); // Load the objects addObject(20, "player"); addObject(10, "trap"); addObject(32, "key"); // Add the objects to the game scene add(interactables); add(player); } function addObject(tileIndex:Int, objectType:String):Void { // Instead of "addPlayer", we have a generic "addObject" function // that can be used to create different game objects accordingly. var objectCoords:Array<FlxPoint> = level.getTileCoords(tileIndex, false); for (i in 0...objectCoords.length) { var objectPoint:FlxPoint = objectCoords[i]; var object = new FlxSprite(objectPoint.x, objectPoint.y); object.loadGraphic("assets/images/tumblr_mh2mhude3E1qcptgwo1_250.png", false, 16, 16); object.animation.add("idle", [tileIndex]); object.animation.play("idle"); switch (objectType) { case "player": player = object; break; case "trap", "key": interactables.add(object); break; default: break; } } var objectTiles:Array<Int> = level.getTileInstances(tileIndex); var objectTile:Int = objectTiles[0]; level.setTileByIndex(objectTile, -1, true); // remove player map tile } function onTouchItem(player:FlxSprite, item:FlxSprite):Void { trace("touched : " + item); } override public function update():Void { // Automatically handle collision on each update FlxG.collide(player, level); FlxG.overlap(player, interactables, onTouchItem); // NOTE: For collisions to work, objects need to be moved // using physics, i.e. setting its velocity. // Assuming that no key was pressed, the default velocity // of the player will be zero on X and Y axis (no movement). player.velocity.x = 0; player.velocity.y = 0; // save key press booleans into variables for easy readability var pressLeft = FlxG.keys.anyPressed(["LEFT"]); var pressRight = FlxG.keys.anyPressed(["RIGHT"]); var pressUp = FlxG.keys.anyPressed(["UP"]); var pressDown = FlxG.keys.anyPressed(["DOWN"]); // If any of the buttons were pressed, set the velocity // accordingly. if (pressLeft) { player.velocity.x = -100; } if (pressRight) { player.velocity.x = 100; } if (pressUp) { // NOTE: negative velocity is upwards player.velocity.y = -100; } if (pressDown) { // NOTE: positive velocity is downwards player.velocity.y = 100; } // NOTE: the collision will NOT work if you update its position // directly rather than setting its velocity, such as the code below: // player.x += 5; super.update(); } override public function destroy():Void { super.destroy(); } } |
Oops, I forgot about the door object, but you should get the rough idea by now. The code above isn’t complete, but it shows how we can parse the map objects manually, if you’re loading a single .CSV file.
There’s of course a better way to load map data, assuming you have multiple layers. Perhaps I’ll cover that in a separate tutorial next time.
In the meantime, you can check out HaxeFlixel’s official tutorial (Part 5), for a rundown on how to load OgmoEditor’s data file (which includes layers). StrandedSoft’s SHMUP tutorial (Part 2) also talks about loading TiledEditor’s TMX map data.