
Edit 2015-04-24: This tutorial has been revised completely to cater for multiple tile/object layers.
So far we have covered how to load CSV data and then parsing the loaded data. However, we assumed there’s only one layer; so if there is a player tile at (10,5), then there cannot be any ground tile behind it. And what if there’s an enemy that spawns on a specific grass tile? We would usually need layers. This is where Tiled Editor and the TMX file come in.
In Tiled, you can create multiple “tile” and “object” layers. You could have a map with the following setup:
- tile layer for background (ground, river, etc.)
- tile layer for foreground (walls, trees, etc.)
- object layer for actors (player, enemies, treasure, etc.)
Before we proceed, let me share some nuggets of knowledge I gained while researching on how to parse TMX data:
- What you need to load TMX data
- In order to load TMX data, you only need the TiledMap addon, flixel.addons.editors.tiled.TiledMap .
- The addon is a haxelib which needs to be enabled in the Project.xml file, like this: <haxelib name="flixel-addons" />
- TMX layer data format
- Getting the layer data is quite flimsy: if the TMX format is in CSV, then you need to access the data via “csvData” property. If the TMX format is Base64, you need to access the data via “tileArray” property. I couldn’t get XML data from the TMX file, and since FlxTilemap isn’t able to parse XML data anyway, we’re only left with two choices.
- Parsing TMX data
- TiledMap only loads the TMX file’s data. You will have to parse the data yourself. TMX data loads two main parts of the file — the tileset list, and the layer list.
- The tileset list contains all the tilesheet images that you used in the TMX map. In Tiled Editor, you can import multiple different spritesheets and use them in one project.
- The layer list (if you saved the layer format as CSV) will contain an array of CSV data for each layer. This is just a more convenient way of saying the TMX file keeps multiple CSV data in one place.
- TMX loading/parsing limitations
- This is very important when proceeding with parsing TMX data. I struggled for a long time on figuring out an easy way to do this, until I realised the following limitations.
- HaxeFlixel does not have any function (as far as I know) that supports loading a tile map which uses multiple tilesheets. As such, each layer can only have ONE tilesheet associated with it.
- Layers in the TMX file also do NOT store info on which tilesheet is being used. As a result, you need to add a custom property on each layer to explicitly store the name of the tilesheet you used for that layer.
- In short, TiledMap only extracts most of the important info you need from the TMX file. It’s entirely up to you regarding how you’ll use the data to generate and render the tile map.
With the wisdom above, let us proceed.
Setup
First, let’s create a template HaxeFlixel project with an arbitrary name:
|
1 |
flixel tpl -n "MyTmxLoader" |
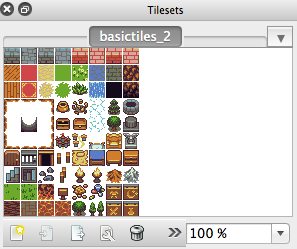
Next, let’s setup the necessary resources — we need a placeholder tilesheet. Let’s use this excellent sample from Sharm, “tiny 16 basic“. We’ll be using 4 images from there:
- basictiles_2.png
- characters_1.png
- dead_1.png
- things_0.png
Put the images in your project’s /assets/images folder.
TMX Data Setup
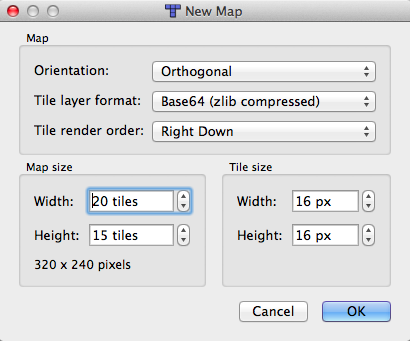
Now to create the TMX file. Here’s the bare minimum steps you’d usually have to go through to create a layered TMX file:
1) Create a new project.
2) Add the image tilesheets (basictiles_2.png, characters_1.png, dead_1.png and things_0.png) to your project.


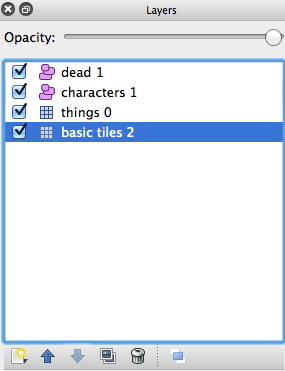
3) For the purpose of demonstrating multiple tile and object layers, let’s create two tile layers and two object layers. In my example below, I renamed the layers to match the tilesheet image’s name which I’ll use for each layer.
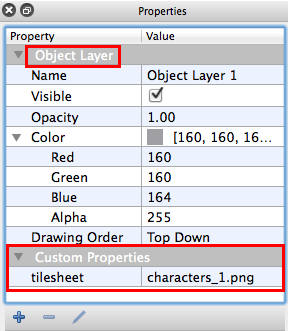
4) Add a custom property to the tile layers so that when we parse the data in HaxeFlixel later, we can know what tilesheet this layer is using.

5) Do the same for the object layers.
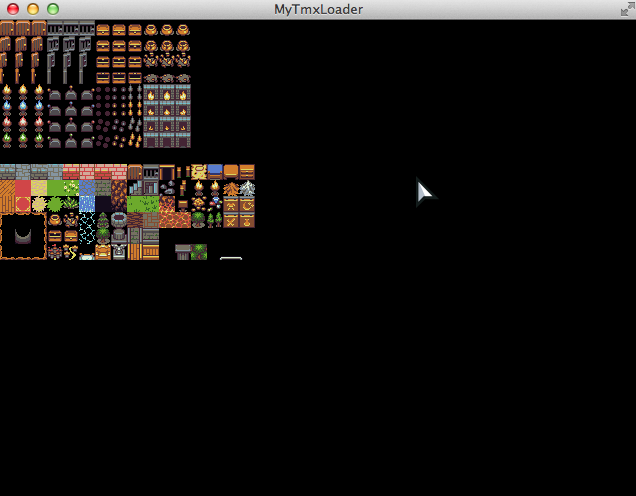
6) Now place the tiles in the tile layer as you like. In my example below, I tried to use all possible tiles from each layer to test if all of them would appear correctly:


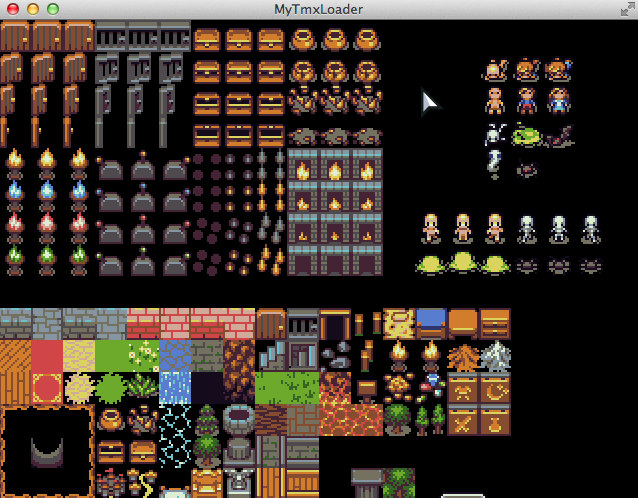
7) Do the same for the object layers:


8) When I enable all the layers, I should be able to see all of them, like this:

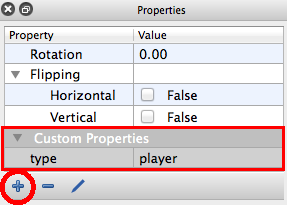
9) This step is optional. When you have specific object types in the object layer, such as “player”, “enemy”, “door” and “key”, you would normally do this — Select an arbitrary “player” object and add a custom property “type” to it, with the value “player”. We will use this value to parse it in TiledMap later. Without doing this, we won’t know how to identify different unique objects in the layer when we want to parse the data later. Repeat this step for other objects, such as enemies (“type” = “enemy”).
10) Save the file as something easy to remember, e.g. “my-map.tmx” Put the TMX file in the /assets/data folder. You’re now ready to load and parse the map data in HaxeFlixel!
Code
Now let’s get straight to the code:
|
1 2 3 4 5 6 7 8 9 10 11 12 13 14 15 16 17 18 19 20 21 22 23 24 25 26 27 28 29 30 31 32 33 34 35 36 37 38 39 40 41 42 43 44 45 46 47 48 49 50 51 52 53 54 55 56 57 58 59 60 61 62 63 64 65 66 67 68 69 70 71 72 73 74 75 76 77 78 79 80 81 82 83 84 85 86 87 88 89 90 91 92 93 94 95 96 97 98 99 100 101 102 103 104 105 106 107 108 |
package; import flixel.FlxState; import flixel.FlxG; import haxe.io.Path; import flixel.tile.FlxTilemap; import flixel.addons.editors.tiled.TiledMap; class MenuState extends FlxState { override public function create():Void { super.create(); // Load the TMX data var tiledLevel:TiledMap = new TiledMap("assets/data/my-map-2.tmx"); // Get map variables var tileSize = tiledLevel.tileWidth; var mapW = tiledLevel.width; var mapH = tiledLevel.height; // Loop through each tile layer and render tile map for (layer in tiledLevel.layers) { // Remember: // TiledMap can only load data of type "String" or an "Array<Int>" // types, so there is no need load or parse XML data. // There are two ways to load layer data: // 1) If the TMX is saved in CSV format, then use this: // var layerData:String = layer.csvData; // 2) If the TMX is saved in base64, then use this: // (we shall assume our TMX is base64 format for now) var layerData:Array<Int> = layer.tileArray; // IMPORTANT: // If you used the wrong method to load the data, // the game will crash. :( // By default, the tilesheet used for this layer is not included in // the layer's data. As such, we had to add a custom property "tilesheet" // and include the tilesheet's name manually. var tilesheetName:String = layer.properties.get("tilesheet"); var tilesheetPath:String = "assets/images/" + tilesheetName; // Finally, create the FlxTilemap and get ready to render the map. var level:FlxTilemap = new FlxTilemap(); // If we're passing an array of data, the level needs to know // how many columns of data to read before it moves to a new row, // as noted in the API page: // http://api.haxeflixel.com/flixel/tile/FlxTilemap.html#loadMap level.widthInTiles = mapW; level.heightInTiles = mapH; // Note: The tilesheet indices are continuous! This means, // if there is more than one tilesheet, the 2nd tilesheet's // starting index right after the 1st tilesheet's last index. // e.g. // - tilesheet 1 has 100 tiles (index = 1-100) // - tilesheet 2 has 100 tiles (index = 101-200 instead of 1-100) // // Note2: that the gid "0" is reserved for empty tiles var tileGID:Int = getStartGid(tiledLevel, tilesheetName); // Render the map. // Note: the StartingIndex is based on the tilesheet's // startingGID rather than the default 1. level.loadMap(layer.tileArray, tilesheetPath, tileSize, tileSize, FlxTilemap.OFF, tileGID); add(level); } } function getStartGid (tiledLevel:TiledMap, tilesheetName:String):Int { // This function gets the starting GID of a tilesheet // Note: "0" is empty tile, so default to a non-empty "1" value. var tileGID:Int = 1; for (tileset in tiledLevel.tilesets) { // We need to search the tileset's firstGID -- to do that, // we compare the tilesheet paths. If it matches, we // extract the firstGID value. var tilesheetPath:Path = new Path(tileset.imageSource); var thisTilesheetName = tilesheetPath.file + "." + tilesheetPath.ext; if (thisTilesheetName == tilesheetName) { tileGID = tileset.firstGID; } } return tileGID; } override public function update():Void { super.update(); } override public function destroy():Void { super.destroy(); } } |
Now if you test the game with lime test neko …
Oops, I forgot to set the screen resolution, but let’s assume you fixed that (change the gameWidth and gameHeight values in Main.hx).
Anyway, the game renders the two tile layers correctly! Now you know how to load multiple layers in your tilemap. Now let’s load the game objects:
|
1 2 3 4 5 6 7 8 9 10 11 12 13 14 15 16 17 18 19 20 21 22 23 24 25 26 27 28 29 30 31 32 33 34 35 36 37 38 39 40 41 42 43 44 45 46 47 48 49 50 51 52 53 54 55 56 57 58 59 60 61 62 63 64 65 66 67 68 69 70 71 72 73 |
package; import flixel.FlxState; import flixel.FlxG; import flixel.FlxSprite; import haxe.io.Path; import flixel.tile.FlxTilemap; import flixel.addons.editors.tiled.TiledMap; class MenuState extends FlxState { override public function create():Void { super.create(); // Load the TMX data ... // Get map variables ... // Loop through each tile layer and render tile map ... // Loop through each object layer and spawn the objects. for (group in tiledLevel.objectGroups) { var tilesheetName:String = group.properties.get("tilesheet"); var tilesheetPath:String = "assets/images/" + tilesheetName; trace("group : " + group.name + " , " + tilesheetPath); for (object in group.objects) { var objectType:String = object.custom.get("type"); var objX:Int = object.x; var objY:Int = object.y; // NOTE: same as layer note above, regarding tilesheet indices. var tileGID:Int = getStartGid(tiledLevel, tilesheetName); // Get the current tilesheet's id by subtracting // the object's gid from the tilesheet's firstgid value. var frameIndex:Int = object.gid - tileGID; // For example purposes, all objects are regarded as same type. switch(objectType) { case "player": createObject(objX, objY, tilesheetPath, tileSize, frameIndex); case "enemy": createObject(objX, objY, tilesheetPath, tileSize, frameIndex); case "door": createObject(objX, objY, tilesheetPath, tileSize, frameIndex); case "key": createObject(objX, objY, tilesheetPath, tileSize, frameIndex); default: createObject(objX, objY, tilesheetPath, tileSize, frameIndex); } } } } function createObject (objX:Float, objY:Float, tilesheetPath:String, tileSize:Int, frameIndex:Int) { var player:FlxSprite = new FlxSprite(objX, objY); player.loadGraphic(tilesheetPath, false, tileSize, tileSize); player.animation.frameIndex = frameIndex; add(player); } function getStartGid (tiledLevel:TiledMap, tilesheetName:String):Int { ... } ... } |
EDIT: Thanks to Keith for the info — If you’re familiar with some other languages (C++, C#, etc.), you probably have this habit of ending every switch case with a break , like I do.
However, in Haxe, switch cases do NOT fall through, as stated on the syntax page. In fact, if you add breaks in your switch case, it will end up exiting the while-loop or for-loop outside of the switch block.
… And now, we can see the objects on the map as well:

But wait, we’re not quite done yet — Notice that the placement of the objects in the layer is a little off (the y-position is lower by one tile than it should be). Thanks to Rafael J in the comment for fix:
|
1 2 3 4 5 6 7 8 9 10 11 12 13 14 15 16 17 18 19 20 21 22 23 24 25 26 27 28 29 30 31 32 33 34 35 |
// Loop through each object layer and spawn the objects. for (group in tiledLevel.objectGroups) { var tilesheetName:String = group.properties.get("tilesheet"); var tilesheetPath:String = "assets/images/" + tilesheetName; trace("group : " + group.name + " , " + tilesheetPath); for (object in group.objects) { var objectType:String = object.custom.get("type"); var objX:Int = object.x; var objY:Int = object.y; if (object.gid != -1) objY -= group.map.getGidOwner(object.gid).tileHeight; // NOTE: same as layer note above, regarding tilesheet indices. var tileGID:Int = getStartGid(tiledLevel, tilesheetName); // Get the current tilesheet's id by subtracting // the object's gid from the tilesheet's firstgid value. var frameIndex:Int = object.gid - tileGID; // For example purposes, all objects are regarded as same type. switch(objectType) { case "player": createObject(objX, objY, tilesheetPath, tileSize, frameIndex); case "enemy": createObject(objX, objY, tilesheetPath, tileSize, frameIndex); case "door": createObject(objX, objY, tilesheetPath, tileSize, frameIndex); case "key": createObject(objX, objY, tilesheetPath, tileSize, frameIndex); default: createObject(objX, objY, tilesheetPath, tileSize, frameIndex); } } } |
And now the positions are all correct!
The code above isn’t complete — we didn’t cover customising tile property, player/enemy logic, etc.. But anyway this concludes the tutorial. Thank you for reading. 🙂